Recently I needed some video surveillance camera setup for our small office. There will be some de-and then construction work in our area and I just want to make sure that this does not attract some morons… anyway.
So I looked around and since this will definitely not be a permanent thing (I despise video surveillance!) I did not want to invest a lot of money. I also did not want some cheap cameras from anywhere connected to my LAN so that anyone getting access to the camera eventually also getting access to our LAN.
Then on eBay I found what seemed to fit my bill and be pretty cheap at the same time, a Chinese set comprised of four WiFi/LAN cameras plus a central control and recording unit (NVR) from a maker called SANNCE. The set is also called „5322-W“, the NVR has the model number „N48WHE“ and the cameras are „I71GL“.

I had heard a bit about such dedicated surveillance cameras and expected the cameras to have a more or less dysfunctional web interface and that I would likely be able to stream data from them by hacking up some curl/wget/rtsp stuff on our server and be done with it.
But not with this set, I had to find out.
Getting Inside
Don’t get me wrong, the cameras are pretty good, good picture, good night vision, pretty OK lenses (pretty wide angle), the NVR unit does what you expect from such a thing, i.e. displaying all camera feeds at the same time on an attached VGA or HDMI screen – all fine and dandy!
But I could not get a single frame out of this setup from a Linux machine! The web interface of the NVR box itself requires a – lo and behold – Shockwave Flash plugin! What on earth!? But at least it did expose the network and authentication credentials for the WiFi, that the NVR spans up for the cameras. So I attached my laptop to that WiFi and looked at the cameras – no web interface either! And they also did not react to the most common camera interfaces, be it RTSP or HTTP. Super annoying.
So I opened up the NVR device. To my (not so) great surprise I found a tiny PCB in there with a tiny chip in the middle with a heat sink, the WiFi module and a mystery radio module I have no idea what it is good for. But there was also a 2.54mm pitch four position pin header! And even silkscreen print on the PCB that said „GND RX0 TX0 NULL“ – ha! If this isn’t a serial interface! In the picture below you can see I have attached three wires to the pinheader, black, blue and yellow, towards the bottom right corner, next to the screw:
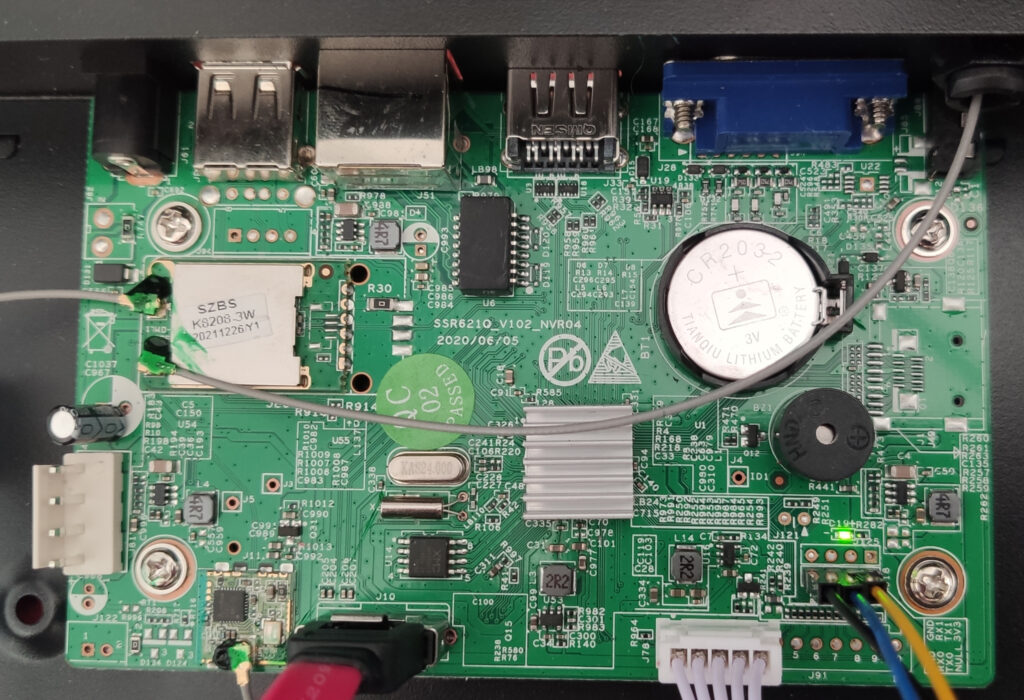
NVR PCB
As usual with these embedded devices, this is not a RS232, so the level shifters are missing which means you will need something like an FTDI or other UART adapter with not more than 5V output. And then, here you go, this is the boot up:
IPL g8e04b60
D-1f
HW Reset
miupll_233MHz
MIU0 zq=0x003d
miu_bw_set
utmi_1_init done
utmi_2_init done
utmi_3_init done
usbpll init done......
SPI 54M
clk_init done
P1 USB_rterm trim=0x0001
P1 USB_HS_TX_CURRENT trim=0x0001
P2 USB_rterm trim=0x0001
P2 USB_HS_TX_CURRENT trim=0x0002
P3 USB_rterm trim=0x0001
P3 USB_HS_TX_CURRENT trim=0x0002
PM_vol_bgap trim=0x0004
GCR_SAR_DATA trim=0x0192
ETH 10T output swing trim=0x0000
ETH 100T output swing trim=0x0000
ETH RX input impedance trim=0x0000
ETH TX output impedance trim=0x0001
MIPI_HS_RTERM trim=0x0001
MIPI_LP_RTERM trim=0x0000
TX_current trimming trim[0x1A]=0x0041
TX_current trimming trim[0x1B]=0x0043
TX_current trimming trim[0x1C]=0x0040
HDMI2TX Rterm trim=0x0001
HDMI2TX_Ibias_CH0 trim=0x001a
HDMI2TX_Ibias_CH1 trim=0x001b
HDMI2TX_Ibias_CH2 trim=0x001b
HDMI2TX_Ibias_CH3 trim=0x001b
256MB
BIST0_0001-OK
Enable MMU and CACHE
Load IPL_CUST from NOR
offset:00010000
Unable to detect NOR
Load time 683 us, 25862 KiB/s
crc OK

IPL_CUST g8e04b60
MXP found at 0x00020000
runUBOOT()
runUBOOT()
[SPI_NOR]
-Verify UBOOT CRC32 passed!
-Decompress UBOOT XZ
decomp_size=0x00081788
Disable MMU and D-cache before jump to UBOOT�

U-Boot 2015.01 (Aug 12 2020 - 10:21:49)

Version: I2g45a386a
I2C: ready
DRAM:
WARNING: Caches not enabled
gpio debug MHal_GPIO_Pad_Set: pin=44
gpio debug MHal_GPIO_Pad_Set: pin=17
gpio debug MHal_GPIO_Pad_Set: pin=18
gpio debug MHal_GPIO_Pad_Set: pin=39
nor_flash_mxp allocated success!!
Flash is detected (0x1003, 0x20, 0x70, 0x18)
SF: Detected nor0 with total size 16 MiB
MXP found at mxp_offset[3]=0x00020000, size=0x1000
env_offset=0x60000 env_size=0x10000
Flash is detected (0x1003, 0x20, 0x70, 0x18)
SF: Detected nor0 with total size 16 MiB
In: serial
Out: serial
Err: serial
Net: MAC Address 00:32:65:00:00:04
Auto-Negotiation...
Link Status Speed:100 Full-duplex:1
sstar_emac
BootLogo IN(234f8eb0 40000), OUT(f700000, 800000), DISP(1280 1024 60), Interface:1
_BootLogoHdmitxCtrl 3258
Flash is detected (0x1003, 0x20, 0x70, 0x18)
SF: Detected nor0 with total size 16 MiB
SF: 2621440 bytes @ 0x70000 Read: OK
## Booting kernel from Legacy Image at 22000000 ...
Image Name: MVX4##I2M#gc45adec26KL_LX409##[B
Image Type: ARM Linux Kernel Image (lzma compressed)
Data Size: 2613036 Bytes = 2.5 MiB
Load Address: 20008000
Entry Point: 20008000
Verifying Checksum ... OK
-usb_stop(USB_PORT0)
-usb_stop(USB_PORT1)
-usb_stop(USB_PORT2)
Uncompressing Kernel Image ...
[XZ] !!!reserved 0x21000000 length=0x 1000000 for xz!!
XZ: uncompressed size=0x522000, ret=7
OK
atags:0x20000000

Starting kernel ...

Booting Linux on physical CPU 0x0
Linux version 4.9.84 (root@linux) (gcc version 4.9.4 (Buildroot 2017.08-gc7bbae9-dirty) ) #55 SMP PREEMPT Sat Nov 21 10:21:23 CST 2020
CPU: ARMv7 Processor [410fc075] revision 5 (ARMv7), cr=50c5387d
CPU: div instructions available: patching division code
CPU: PIPT / VIPT nonaliasing data cache, VIPT aliasing instruction cache
early_atags_to_fdt() success
OF: fdt:Machine model: INFINITY2M SSC010A-S01A-S
LXmem is 0xff00000 PHYS_OFFSET is 0x20000000
Add mem start 0x20000000 size 0xff00000!!!!
This shows us two things:
- there is a serial console, bingo! (115200 8N1 BTW)
- there is UBoot booting the thing which subsequently starts:
- a Linux kernel and system!
Ok, that was three things.
Intermission – Free Software
Let’s take a pause for a moment here. What we have learned so far is that this thing is full of open source and free software. And it’s not only the NVR that is, it’s also the cameras! UBoot, Linux, Busybox, the whole embedded Linux shebang. Offer for sourcecode anywhere? None. Do they, i.e. the manufacturer SANNCE even mention it anywhere? No. Would they have to? Hell, yes!
So this is a pretty clear case of free software license infringement by a larger Chinese corporation making money, and I guess quite a bit, from illegally using free software. Very very annoying. And they can get away with it! Try to sue a Chinese company for releasing the code, good luck!
This is very annoying, very. But well, can not do much about it now, so let’s continue trying to pry the software open so that we can make (more) use of it.
Getting Shell Access – Almost root
The system that gets booted is pretty closed. All boot files are in immutable filesystems like Squashfs. You can stop UBoot from booting through so I tried the usual trick like „init=/bin/sh“ on the kernel commandline but that did not work. Also after booting up you do not get to a shell prompt on the serial console either, too bad. From the network side there are only port 80 and 10000 open. Port 10000 is likely the port for streaming data from the device but the protocol is unknown. Port 80 is the web interface of the NVR. So no shell access either.
The I found this gist thread on Github and this has a real pearl in it:
me@here:/media/me/SANDISK$ echo 1000000001 > enable_log_forever
me@here:/media/me/SANDISK$ cat <<EOF>app.out
#!/bin/sh
/usr/sbin/telnetd &
echo 'toor::0:0:root:/root:/bin/sh' >> /etc/passwd
exec /media/usb1/app.out_chain "\$@"
EOF
me@here:/media/me/SANDISK$ cat <<EOF>app.out_chain
#!/bin/sh
umount /opt/app/app.out
exec /opt/app/app.out "\$@"
EOF
me@here:/media/me/SANDISK$
When doing this on a Linux workstation with a VFAT blank formatted USB stick, creating these three files enable_log_forever, app.out and app.out_chain, insert the stick into the NVR and power it up you will now also get a telnetd running on port 53! Problem is, how to log into that thing? On the internet you also find some default root passwords for devices like this, like „j1/_7sxw“ or „xmhdipc“ – sorry, no root. Also the approach taken in the above quoted script trying to create a new user „toor“ with empty password did not work for me either since a) the rootfs is read only, where also the /etc/passwd is stored on and b) my system seems to have been upgraded to shadow passwords.
Can it be so complicated!?
So I added something else to the scripts… knowing that the serial interface is ttyS0 I added this line to the app.out script:
( cat /dev/ttyS0 | sh - > /dev/ttyS0 ) &
This should gives us a really very bare metal root shell – and indeed it does! This way I was able to get the content of the passwd and shadow files and found that there is a user „stb“ with the same password, i.e. „stb“, so finally we can log in:
Escape character is '^]'.
(none) login: stb
Password:
login: can't change directory to '/home/stb'
Welcome to MiLinux.
/ $
But of course we are now not root, just a regular user. Nevertheless this is already a lot more comfortable than the hacky serial shell.
The stb password was found within seconds using John, the root password seems to be a tougher nut to crack, my small workstation is still working on it.
Accessing The Video Streams
Getting access to the stream via the NVR seems a still unsolved problem. Some older models or firmware versions seem to have had RTSP enables and even the SANNCE support replied to use RTSP to get access but this very obviously does not work, i.e.:
rtsp://192.168.1.23:80/ch0_0.264
They said that ch0 is the stream of camera 1, ch1 would be of camera 2 etc. and that _0 is the main stream and _1 the preview stream. But that does not work, it fails immediately since the NVR does not send any data and closes the connection instantly. So I am more focusing on the cameras now. Accessing the cameras on the WiFi directly is an option but that requires of course that the party trying to get access needs to attach to the camera WiFi network. But the NVR already has this and it is also connect to my local LAN via Ethernet. So why not use that as a router?
This can be done pretty easily by enabling IP forwarding, it is Linux after all! And that’s the commandline for it:
sysctl -w net.ipv4.conf.all.forwarding=1
This actually works! I was able to enter this above commandline in my improvised serial console shell and tadah – I can add a route on my workstation using the NVR as gateway into the private camera WiFi network:
route add -net 172.20.14.0 netmask 255.255.255.0 gw 192.168.2.169
So the net 172.20.14.0 is the IPv4 network the NVR creates for the camera WiFi, the 192.168.2.169 is the IPv4 address that the NVR was assigned from my DHCP server. One of the cameras has the IP 172.20.14.39 and so I can now access this IP from my workstation:
$ ping 172.20.14.39
PING 172.20.14.39 (172.20.14.39) 56(84) bytes of data.
From 192.168.2.169: icmp_seq=1 Redirect Host(New nexthop: 172.20.14.39)
64 bytes from 172.20.14.39: icmp_seq=1 ttl=63 time=4.19 ms
From 192.168.2.169: icmp_seq=2 Redirect Host(New nexthop: 172.20.14.39)
64 bytes from 172.20.14.39: icmp_seq=2 ttl=63 time=3.45 ms
From 192.168.2.169: icmp_seq=3 Redirect Host(New nexthop: 172.20.14.39)
64 bytes from 172.20.14.39: icmp_seq=3 ttl=63 time=3.06 ms
From 192.168.2.169: icmp_seq=4 Redirect Host(New nexthop: 172.20.14.39)
64 bytes from 172.20.14.39: icmp_seq=4 ttl=63 time=2.84 ms
From 192.168.2.169: icmp_seq=5 Redirect Host(New nexthop: 172.20.14.39)
64 bytes from 172.20.14.39: icmp_seq=5 ttl=63 time=4.23 ms
Why I do get these ’nexthop‘ messages I am not sure yet, but they stop after a while. So now we have IP access to the camera WiFi net, great!
The cameras themselves do not use any common way for getting video out of them, so no RTSP, ONVIF etc. But since I am also not the first person to play with these I found a bunch of hints for different models of similar cameras and some of these actually work!
By now I can confirm that you can actually stream video from the cameras using HTTP, like here using ffplay, you need some additional magic headers for it to work:
ffplay -f:v hevc -headers "Authorization: Basic YWRtaW46" "http://172.20.14.39:80/livestream/11?action=play&media=video_audio_data"
Which gives you the main stream of the camera. If you replace „…livestream/11…“ with „…/12…“ you will get the reduced preview stream instead. The „Authorization: Basic YWRtaW46“ is not giving away anything here, it is just the base64 encoded string „admin:“ which means username ‚admin‘ and no password.
You can get a JPEG preview image too using wget:
wget --auth-no-challenge --user='admin' --password='' http://172.20.14.39:80/snapshot.jpg
I do not know yet if also higher resolution snapshots can be taken, that would be nice (the default seems to be a JPEG of the second stream, in my case this is fixed to 640×360).
To be continued…
Great findings! Can you provide the password for the user stb? I would like to replicate that with the NVR in my parents house.
Thank you
Hi, thank you for detailed information.
Is there a way to change the LAN IP address without the NVR.
I have two cameras of these with broken NVR. Both cameras have same LAN IP address and I do not know how to change it.
Thank you in advance.