Recently I got myself a new toy, which is actually a very useful toy, a thermal camera! The one I got was used from eBay, a FLIR ONE Pro „for Android“ with USB type-C connector, this is how it looks like:

This is a pretty neat device as it attaches directly to the USB type–C port of a mobile phone (or other device). There is a second type-C connector on it which is only used for charging the internal battery. Why they included this is a bit beyond me, maybe they anticipated that not all Android phones would be able supply enough juice? The most important part though is the thermal image sensor. In the Pro version this has a resolution of 160×120 pixel and a thermal range from -20C to +400C! Additionally there is a regular visible light camera included which can be used to overlay a visible picture onto the thermal (IR) one.
Debugging Electronic With Thermal
The main reason why I bought it was because I needed to debug some embedded electronics with it. Sound weird? Well yes, it may. Sometimes during development you end up in the situation that your circuit still consumes too much energy and you have no idea why, the only thing you do know that it shouldn’t. In a former project I spent weeks chasing down some 10mA and was not able to find it. What makes it so hard is that first you do not know if it is a software or hardware problem. And once you settle on the software side in many designs you quickly drown in possible options – so many pins, so many functions, so many components. And these all have to play nice together! You have to be sure what each and every component does at any given time or you may end up inadvertently driving two signals against each other or feeding power though a logic line to some component.
Since electrical energy in circuits is turned into heat, a thermal camera is an awesome way to at least start to spot which of your components on a PCB gets warm. And if you are lucky, you know that it shouldn’t and can then look closer why this very thing still consumes power. In the before mentioned case we indeed found the sucker, which was a level shifter that got powered down in suspend but the host CPU was still driving a logic signal to – bam!
My current target for analysis is the Purism Librem 5 phone and seeing which of the components draws most energy to then hunt them all down 🙂
Getting It To Work
So the FLIR ONE Pro I got is intended for Android and with the FLIR Android app from the Google app store it works pretty much out of the box which is nice! The app has a bunch of nice features to play with and does it’s job. One nasty bit is though that FLIR always superimposes their company logo into the images takes, which is a bit annoying. But this is a USB device:
Bus 001 Device 009: ID 09cb:1996 FLIR Systems FLIR ONE Camera
Shouldn’t this also be able to work on Linux, on a regular laptop or so? First investigation shows, meh, not so easy, it is not a regular USB Video Class (UVC) device. Looking at the FLIR company website they offer a SDK for it, but only for Android and iOS, no hardware documentation and especially no Linux SDK. Pretty sad. Even more sad that they do not allow a free download of the SDK, you have to apply to get access, which Idid not do – this usually comes with a bunch of NDAs of sort, no thanks. But some more searching the net came up with the following Github project: https://github.com/fnoop/flirone-v4l2
Wow, this is awesome! Though I was sceptical at first since it only mentions the FLIR ONE and I had the ONE PRO. To get this to work one also needs something I have not know before, a Video4Linux loopback device drivers, here: https://github.com/umlaeute/v4l2loopback This kernel driver creates virtual V4L devices that a user space program can then feed video data into and other V4L applications will see this like any other regular V4L device, pretty cool!
The driver compiles cleanly for Linux 5.4.x and 5.5.x (I am running 5.5.3 as of today). After compiling the driver and the program and insmodding the driver:
insmod ./v4l2loopback.ko devices=3
and starting the application:
./flirone palettes/Iron2.raw
the camera is active. Now you can start grabbing images from any application that can take V4L video input, for testing I used Guvcview and got this, holding my hand over the sensor:
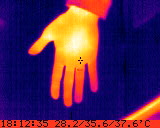
Isn’t that awesome!? Even with measurements! This is a great starting point for all kinds of application development. The low resolution of the shot here is the real physical resolution of the sensor – keep in mind, this is only 160×120. The higher the resolution of a thermal sensor the exponentially higher its cost. The FLIR One Pro has an official price of $399 – ouch!
Update Jan. 2021: I took the flir-v4l code and hacked it into a GTK+ app which is more handy to use – you just start the app and don’t have to install the v4l loopback driver etc. The code is not finished yet, I am still struggling a bit with the Cairo drawing but it is working pretty nicely already, even the JPEG stream of the visual light camera gets decoded and can be overlayed to the IR image. If you want to give it a try, here is the code:
https://source.dpin.de/nica/flir-gtk
That’s how it looks like right now:
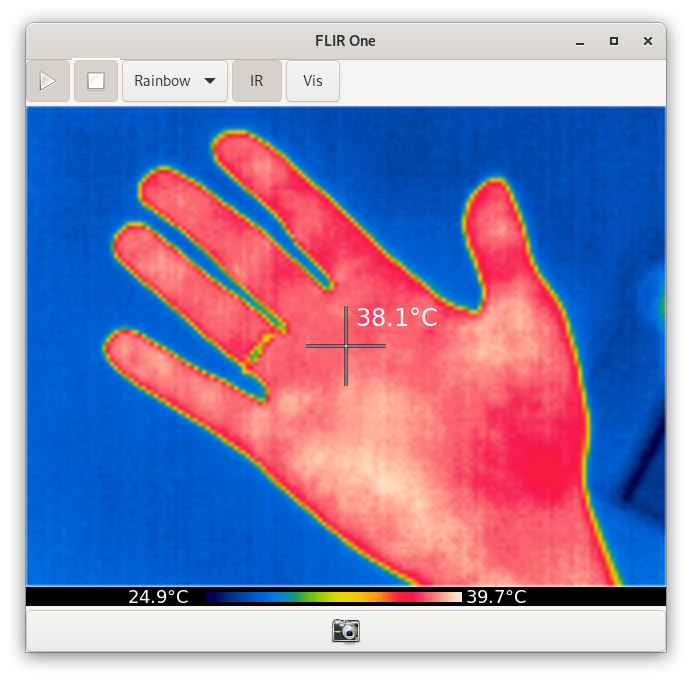
The temperature is pretty obviously off, this seems to be a known problem of the reverse engineered Linux code, it has been discussed in the EEV blog too but seems without comclusion. What I am also still missing is code for changing camera settings (there are persistent setting in the camera?) and things like battery state etc… but well, it is already pretty cool as-is 🙂
Hi thank you for your program! Right now I am having trouble to see the color visible image from device 2. I am able to access both thermal image correctly using openCV. But when I switch to the color visible image device, the display is dark. No image at all. It would be great if you are able to help. Thank you!
Hi Nicole,
Your article helped me a lot, thanks! I found a more precise way of calibrating temperature. Let me know if you’re interested, I will write down the details 😉
Oh yes, thank you, that would indeed be very much appreciated!
We’re all waiting! =O
Does it have to do with the code that computes emissivity? I noticed it is hard coded to 25C but I haven’t done a sensitivity analysis to see if that’s the reason for the apparent offset.
Hi Nicole nice work!
I was trying to use your flir-gtk app however when I compile using the make file this is what I get:
gcc -g -O2 -Wall -D_REENTRANT `pkg-config –cflags gtk+-3.0 libusb-1.0 libjpeg libcjson` -c -o flirgtk.o flirgtk.c
Package libcjson was not found in the pkg-config search path.
Perhaps you should add the directory containing `libcjson.pc‘
to the PKG_CONFIG_PATH environment variable
No package ‚libcjson‘ found
flirgtk.c:20:10: fatal error: gtk/gtk.h: No such file or directory
20 | #include
| ^~~~~~~~~~~
compilation terminated.
make: *** [: flirgtk.o] Error 1
I am using Ubuntu 20.04, and installed all the requirements needed, any help I will appreciate it!
Thank you! 🙂
Thanks for the gtk app, works fine, how to make if fullscreen, 16:9 ratio? Can’t find other apps to overlay both cameras on each other in fullscreen mode 🙁
Hi Nicole,
thanks, I have not been sure how to get this thing to work with Linux. Have been expecting having to reverse engineer it, but obviously someone else already has done the job.
Looks like the repository https://source.dpin.de/nica/flir-gtk is offline. Maybe you could check?
Thanks + regards
mith
Should be back online, I switched my SCM from GitLab (which was total overkill for my small projects) to Forgejo and did not properly redirect. Should be working again now.